Pillow Cover Closures and Opening Design: The Complete Guide
Last updated: November 19, 2026
Quick answer: for most pillow cover closures and opening design choices, start with an envelope opening if you want the simplest sew and a hidden zipper if you want the neatest front; for a V-shaped pillow, the opening usually needs enough room for the widest span and the two arms to move in without forcing the seams. In this guide to Pillow Cover Closures and Opening Design: The Complete Guide, the right opening depends on the pillow shape, the wash routine, and how often the cover comes off.
Key takeaways
- The opening design controls fit more than the fabric does.
- Zippers give the tidiest edge, but they add hardware and can feel stiff.
- Envelope closures are the easiest to sew and remove, especially for odd shapes like a V.
- Ties and buttons can look decorative, yet they are slower to use and can snag.
- A good opening is sized for the insert, not just copied from a flat rectangular pillow.
What does a pillow closure actually do?
A pillow closure does three jobs: it holds the insert in place, makes the cover removable, and shapes how clean the edge looks. On a V-shaped pillow, the closure has to work around corners and angled arms, so a straight opening that would be fine on a standard 50 x 75 cm case may pull badly here.
Therefore, the main choice is not decorative. It is mechanical. A zipper gives a controlled seam line, an envelope flap hides the raw edge with overlapping fabric, and buttons or ties leave a visible opening that can be adjusted but not sealed. The wrong choice shows up fast: loose corners, a gap at the point of the V, or a seam that feels tight after the first wash.
A useful way to think about it is this: the closure should disappear in use. The cleaner the opening, the less the cover distracts from the shape of the insert. If the opening fights the form, the whole case looks off. For a curved or angled pillow, that usually means adding ease and planning the opening before cutting, not after stitching.
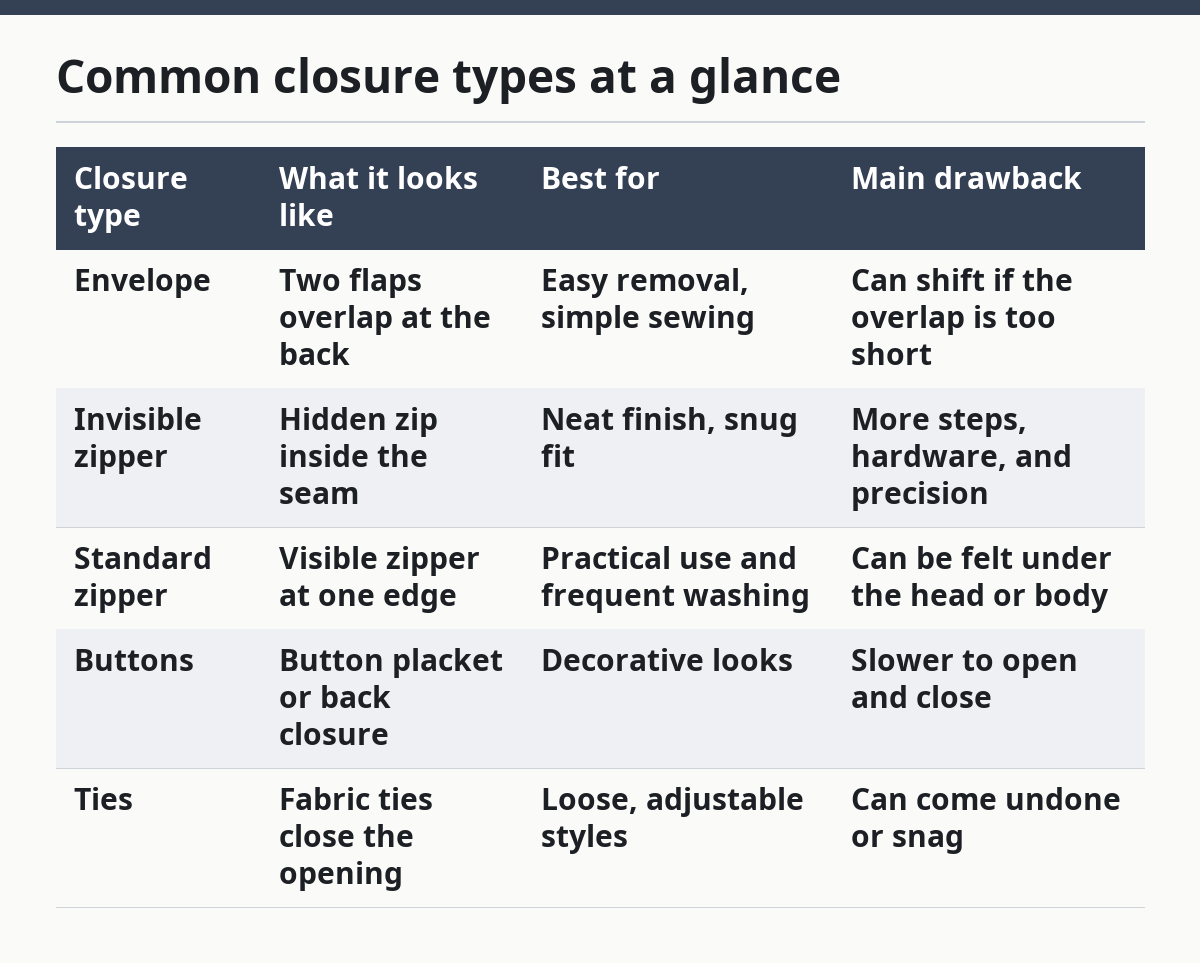
Common closure types at a glance
| Closure type | What it looks like | Best for | Main drawback |
|---|---|---|---|
| Envelope | Two flaps overlap at the back | Easy removal, simple sewing | Can shift if the overlap is too short |
| Invisible zipper | Hidden zip inside the seam | Neat finish, snug fit | More steps, hardware, and precision |
| Standard zipper | Visible zipper at one edge | Practical use and frequent washing | Can be felt under the head or body |
| Buttons | Button placket or back closure | Decorative looks | Slower to open and close |
| Ties | Fabric ties close the opening | Loose, adjustable styles | Can come undone or snag |
Which closure works best for a V-shaped pillow?
For a V-shaped pillow, an envelope opening is often the easiest choice, and a zipper is often the neatest choice. The V shape creates two angled arms and a central notch, so the cover needs either extra overlap or a very accurate seam line to sit flat. See also our related guide on how to measure a pillow cover and zipper placement for covers.
An envelope back is forgiving. The insert can slide in without wrestling a narrow opening, and the overlap hides the raw edge. That matters on a shape with pointed ends, because those points are the first place a cover catches or twists. A zipper is better when the goal is a close, tailored fit, but it asks for cleaner cutting and careful topstitching.
Buttons and ties can work, but they are not always the first pick for this shape. A button line across a curved or angled section can interrupt the contour. Ties are soft, yet they can leave a gap at the stress points unless the overlap is generous. For many readers, the right answer is simple: use an envelope if ease matters, and use a zipper if the line of the cover matters more.
| For a V-shaped pillow | Envelope | Invisible zipper | Buttons | Ties |
|---|---|---|---|---|
| Ease of use | High | Medium | Low | Medium |
| Neat appearance | Medium | High | Medium | Low to medium |
| Fit on odd shapes | High | High | Medium | Low to medium |
| Fast washing routine | High | High | Low | Low |
| Best use case | Daily use | Tailored finish | Decorative style | Soft, casual style |
The key here is the overlap or zipper line at the back — notice how it keeps the front surface uninterrupted. That is what separates a cover that lies flat from one that tugs at the corners.
How should the opening be measured?
The opening should be measured from the insert, not guessed from the finished cover. A flat cover can hide a few centimeters of error; a shaped insert cannot. For a V-shaped pillow, the safest approach is to measure the widest span, the length of each arm, and the depth of the center notch before deciding where the opening will sit.
Start by deciding which side will open. On many covers, the opening belongs on the back panel so the front keeps a clean profile. Then add ease for insertion. If the opening is too short, the insert has to be folded or squeezed, which stresses the seam and makes the point of the V hard to align. If it is too long, the overlap or zipper section may sit loose.
So the numbers on the pattern matter more than a decorative finish. A zipper that runs too close to a corner will buckle. An envelope flap that is too shallow will pop open. A button placket that is too narrow will strain at the holes. The opening should fit the object first, then the design.
A practical measurement sequence
- Lay the insert flat and measure the widest point. Check that you are measuring across the full span, not just one arm. Do not measure over stuffing bulges.
- Measure each arm from the center notch to the tip. Check that both sides are recorded separately. Do not assume the two arms are identical.
- Mark the center notch depth. Check where the bend begins, because that is where strain gathers. Do not cut the opening across the notch without planning for extra room.
- Choose the opening side. Check whether the back panel can hide the closure line. Do not place the opening where the head or body will press hardest.
- Decide the closure style before cutting fabric. Check whether the hardware or overlap needs extra seam allowance. Do not add the closure after the panels are sewn.
- Mock up the opening with pins or clips. Check whether the insert enters without forcing the corners. Do not trim the seam until the fit is verified.
A good opening lets the insert move in with a slight fold and then settle back into shape. A bad opening needs force, catches at the corners, or leaves the fabric wrinkled around the edge.
How does each closure affect the finished look?
Each closure changes the edge, the seam line, and the way the cover ages after repeated use. A zipper gives the straightest line, but it can create a ridge if the pull sits near the sleeping surface. An envelope closure hides its mechanics well, though the back can look bulkier because of the overlap. Buttons add a visible rhythm along the seam, while ties turn the back into part of the design.
In particular, the cleanest visual result comes from a closure that matches the fabric weight. Light cotton takes a zipper well because it can be pressed flat. Heavier fabric, such as a thick woven textile, can make a zipper bulky if the seam allowance is not managed carefully. On a V-shaped pillow, the point and inside angle are the places to watch. Those spots show puckering first.
A hidden zipper is usually the neatest from the front, but it is not always the softest against the body. A back envelope is easier to live with if the cover is changed often. Buttons can look polished, yet they need reinforcement or they loosen with use. Ties make sense when the look is casual and the opening does not need to be perfectly closed.
The opening edge should be straight where the hardware sits and eased only where the shape demands it. Curves and angles need patience. If the closure line distorts, the whole cover looks unfinished even if the sewing is accurate.
What are the sewing steps for a clean opening?
A clean opening comes from planning the seam allowance, placing the closure first, and pressing every step. The order matters because a closure sewn into the wrong place is hard to fix once the panels are closed. For a V-shaped cover, the opening should be built in while the panels are still flat.
Then cut both panels with the same outline. Check that the arms, notch, and outer edges match. Do not cut one side larger and hope to trim later.
Next, mark the opening line clearly. Check that the line is long enough for the insert. Do not place it so close to the corner that it distorts the shape.
After that, finish the raw edge if needed. Check whether the fabric frays. Do not skip this on loose weave cloth.
Then install the chosen closure. Check that the zipper or overlap sits even from end to end. Do not stitch through the wrong layer. If you are comparing hardware, see best zipper choices for home sewing.
Press the opening flat. Check that the seam sits clean and the edge does not ripple. Do not press so hard that the fabric shines or warps.
Close the rest of the seam. Check the point of the V and the inside angle for bulk. Do not stitch across a thick lump without flattening it first.
Finally, turn the cover right side out and insert the form. Check that the corners fill properly and the opening stays shut. Do not force the insert past a tight edge.
The difference between a tidy opening and a rough one is often just 1 careful pass with the iron and 1 careful check before the final seam. A rushed closure looks loose even when the stitching is strong.
What details do people get wrong most often?
The most common mistake is making the opening too short for the insert. A cover can look fine on the table and still fight the moment the insert goes in. That is especially true for a V-shaped pillow, where the notch and arms need room to settle.
Another error is placing the closure on the wrong side of the form. A closure on a high-pressure edge can feel lumpy and can wear faster. People also forget that a buttoned or tied opening needs more handling time every single use. A zipper is faster to operate, but only if the pull is easy to reach and not buried in a seam.
The last mistake is ignoring the finish around the opening. A raw edge inside an envelope flap can fray after a few washes. A zipper without a neat seam allowance can pucker. Buttons without reinforcement can pull away from the fabric. These are small issues on day one and obvious problems by month three.
A practical rule helps here: if the cover needs to survive repeated washing, the opening should be the least fragile part of the project. That is why many experienced makers choose a concealed zipper or a wide envelope overlap rather than a decorative closure that looks good but wears badly.
What should you choose if you want the easiest option?
Therefore, the easiest option is an envelope opening, and the most polished option is a hidden zipper. That is the short answer for most readers, especially anyone making a cover for a V-shaped pillow.
Choose envelope if the insert comes out often, if you want a simple sewing job, or if the shape is unusual enough that you need some forgiveness at the edges. Choose a hidden zipper if the fit needs to look crisp and you are comfortable with a more exact seam. Skip buttons and ties if the goal is daily convenience. They suit a decorative cover more than a cover that gets removed often.
There is also a honest limit to the easy choice. Envelope closures are forgiving, but they can gape if the overlap is shallow. Zippers look sharp, but they ask for more care and hardware. Buttons and ties are attractive on paper, yet they are not the fastest answer for a shape that already has angles to manage. The wrong choice is the one that ignores how the cover will actually be used.
For many shaped covers, the best decision is not the fanciest one. It is the one that opens cleanly, closes with one hand, and stays flat after a 40 cm or 50 cm insert is removed and replaced again.
What do the details say about standards and safety?
Because closures can create snag points, loose parts, or rough edges, safety rules exist for that reason. If the cover is for a child’s item or any product with cords, drawstrings deserve extra caution. The U.S. Consumer Product Safety Commission has guidance on drawstring hazards in children’s products, and the general lesson is simple: avoid unnecessary strings and loose ends where they can catch or tangle. See the CPSC for product safety guidance: https://www.cpsc.gov/Business–Manufacturing/Business-Education/Business-Guidance/Drawstrings-and-Cords
Textile care also matters because a closure that fails after washing is not a good closure. The OEKO-TEX organization publishes textile safety and testing information for materials used in consumer products: https://www.oeko-tex.com/en/our-standards/standard-100-by-oeko-tex. That does not choose the closure for you, but it is a useful reference when checking fabric and trim claims.
The practical takeaway is plain. If the design uses ties, cords, or very small buttons, think about who will handle the cover and how often it will be washed. A neat opening is only useful if it stays intact after repeated use. That is one reason a simple zipper or envelope remains the most sensible answer for many home projects.
FAQ
Which closure is easiest for a beginner?
An envelope closure is the easiest for a beginner. It needs no hardware, no zipper foot, and no button placement. It also gives you a little tolerance if the cut is not perfect, which helps when making a cover for an odd shape like a V-shaped insert.
Is a zipper better than an envelope opening?
A zipper is better when you want the cleanest edge and a snug fit. An envelope is better when you want quick sewing and easy removal. The better choice depends on whether appearance or convenience matters more, and on how often the cover will be taken off.
How wide should the opening be?
The opening should be wide enough for the insert to slide in without folding the shape sharply. If the opening is too narrow, the corners pull and the seam strains. A shaped insert usually needs more room than a flat rectangle because the ends and angles catch as they go in.
Are buttons a good idea for pillow covers?
Buttons can work, but they are not the easiest choice for regular use. They take longer to open and close, and they need reinforcement so the fabric does not stretch around the holes. They suit a decorative look better than a cover that will be changed often.
What is the safest closure for a child’s cover?
A simple closure with no loose cords is usually the safer direction. Drawstrings and long ties can create hazards, which is why safety guidance is stricter for children’s products. If the item is for a child, check the relevant safety rules first and avoid any closure that leaves dangling parts.
Drafted with AI; not yet reviewed by a person.
About the Author